
Headers
Role: Site Owner, Site Administrator
A header is the top section of a page, typically containing the University crest and a site logo, main navigation menu, and sometimes a search bar or other important information. It's a crucial element that provides a consistent user experience and helps visitors navigate the site.
Finding the settings
- After signing in to Fresco, go to the 'Settings’ tab.
- Select 'Header and Footer’. This will take you to the 'Header/Footer' settings page.
- From here, you can edit the site configuration or existing header/footer content.
Adding a header to your site
- On the 'Header/Footer' page under site configuration, start typing the name of the header you want to use in the 'Site header' box. Typically this will be the 'Default site header' unless you've created a custom header.
- Select the header from the list that appears and click ‘Save configuration’.
- A green status message will appear at the top of the page once your changes are saved.
Editing a header
- On the 'Header/Footer' page under existing header/footer content, find the header you need to edit.
- Click 'Edit'.
- In the edit pane:
- Update the 'Title' of the header (only visible to you).
- Change the status, if necessary. This defaults to published.
- Record any changes you've made in the revision log.
- Click on the header in the preview pane.
- Add a 'Header title' (usually the website name) in the edit pane.
- Choose whether to display the University crest and select its shape.
- Update the crest link and link text, if required.
- Select a menu for your site. Menus appearing in the drop-down list (shown below) are created in the Settings > Menus area of the Fresco Admin screen (see main navigation menu).
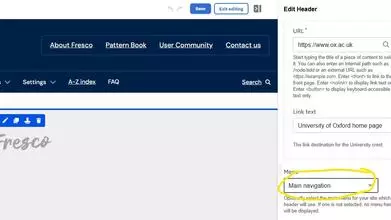
Setting a menu in your header
- Select a 'Quick links' menu, if required.
- Toggle the 'Show search' on/off to make it appear or disappear from the header.
- Add optional search text to display above the search tool.
Adding a custom site logo
- Click on the header in the preview pane and hover over the small box to the right of the University crest.
- Click 'Add site logo' and then click 'Add media'. In the new window, you can either:
- 'Choose file' to upload an image from your computer.
- Select from the images already available.
- Click 'Insert selected' and add an optional link and captions.
- Make any styling adjustments in the 'Styles' tab.
- Click 'Apply' to add the site logo to the header.
Saving changes
- When you are done editing, click 'Save' and 'Exit editing' to see a preview of the header.
Creating a custom header
It is possible to create a custom header to override the default site header. This may be useful if an area of the site requires different branding.
- Go to the 'Settings’ tab and select 'Header and Footer’.
- On the 'Header/Footer' page, click on the blue 'Add Header/Footer' button. This will take you to a 'Create Header/Footer' window.
- In the edit pane, add a name for your header in the 'Title' field.
- In the preview pane, click the blue plus icon and select 'Header'.
- A pop-up window will appear. Choose a header layout (Standard, Microsite, Department) and click 'Apply'. A preview will appear.
- Follow the advice above on editing a header.
Header layouts
There are currently three header layouts options available:
1. Standard header - The default, general-purpose header used by most Fresco sites.

2. Microsite header - Designed for sub-sites within a site that need a distinct identity but remain linked to the parent site.

3. Department header - Intended for Department sites.

Colours are managed via Appearance > Theme and are a site-wide setting. There is no alternative method for changing header colours.
Menus are created and managed in Settings > Menus.
Changes may have been made to enhance this feature since we last updated this page. See What’s new for the latest release information.
Last updated: 2 December 2025